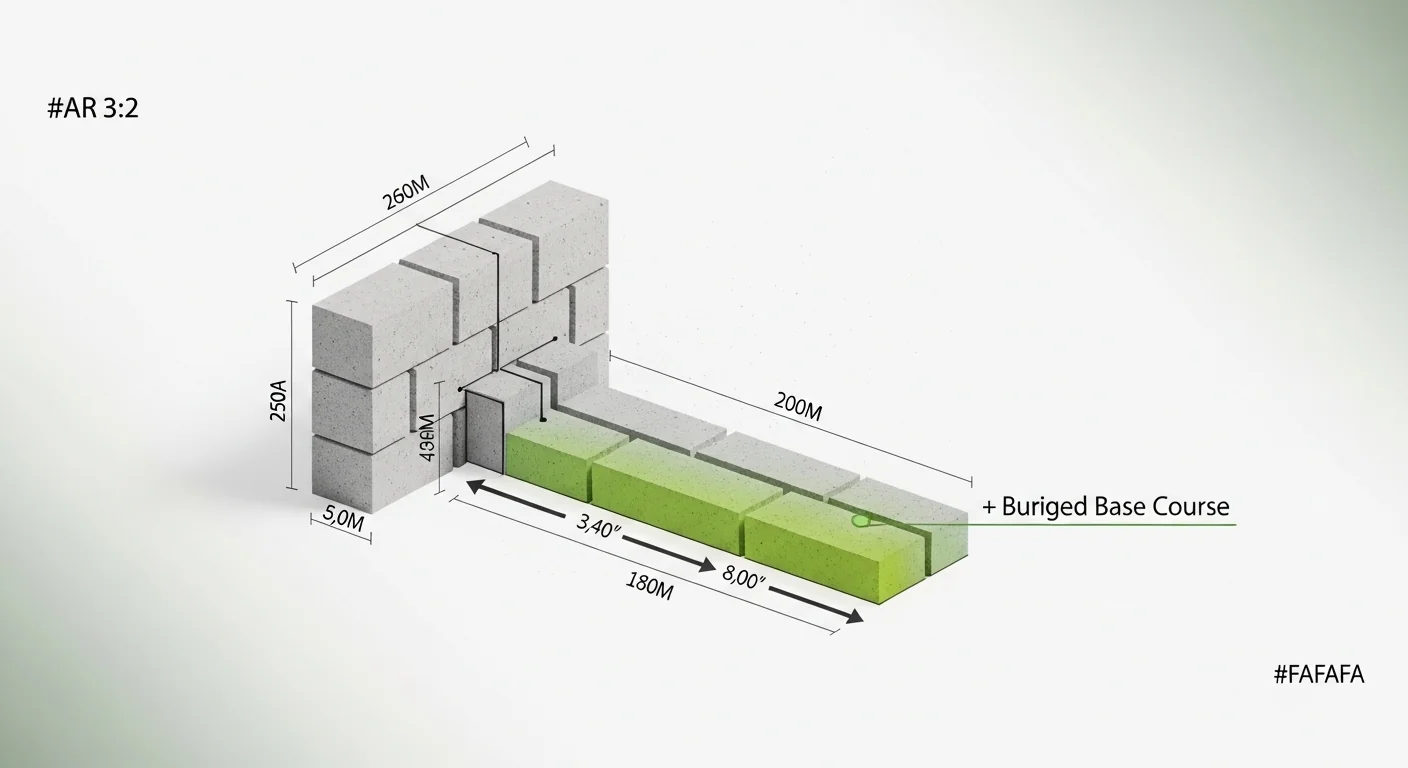
Retaining wall estimates fail at the supplier, not the job site. The typical approach — measure wall length, multiply by height, divide by block face area — produces a number that looks right on paper and falls short in practice. The buried base course, the row of blocks set below grade before the wall rises, is invisible in the finished project and absent from most online calculators. Skipping it means your material order arrives short before a single block goes above ground.
This retaining wall block calculator computes the total block count from wall face area and block dimensions, then automatically adds one full buried row based on your wall length and block length. It separately calculates the linear footage of capstone material if your design calls for a finished top edge. What it does not do is estimate cost, account for wall batter or curves, or replace a site-specific plan for walls requiring engineered design.
After using this tool, you will know the minimum block quantity to order before adding your waste allowance, and you will know whether your wall height triggers a threshold that warrants a structural review.
Use the Tool
Retaining Wall Calculator
by The Yield Grid — Landscaping & Property Management
| Component | Quantity |
|---|
| Wall Size | Block (in) | Visible Rows | Blocks Needed |
|---|
How This Calculator Works
Wall Face Area = Wall Length (ft) × Wall Height (ft) = sq ft
Step 2: Convert block dimensions from inches to feet and calculate block face area:
Block Face Area = (Block Length ÷ 12) × (Block Height ÷ 12) = sq ft
Step 3: Calculate visible wall blocks:
Visible Blocks = Wall Face Area ÷ Block Face Area = blocks
Step 4: Add buried base course (1 extra row for stability):
Base Course Blocks = Wall Length ÷ (Block Length ÷ 12) = blocks
Step 5: Total Blocks = Visible Blocks + Base Course Blocks = blocks
Assumptions & Limits
- Blocks are laid in a standard running-bond or stack-bond pattern.
- No cutting waste is included — add 5–10% for cuts and breakage on site.
- The buried base course adds one full row below grade for structural stability (industry best practice).
- Capstones are calculated as linear feet equal to wall length, assuming standard capstone units.
- Wall height entered is the exposed (above-grade) height only.
- Calculator assumes a straight wall with no curves or corners.
- Maximum recommended residential retaining wall height without engineering: 4 ft.
- Walls above 4 ft may require permits and a structural engineer’s design.
Before entering values, have your measurements ready in the correct units: wall length and height in feet, block length and block height in inches. Most concrete landscape blocks are sold by individual unit, so knowing block dimensions from the manufacturer spec sheet is important. If you are comparing block sizes, run the calculator once for each size to see how total count changes. For projects that involve a gravel drainage layer behind the wall, the gravel calculator can help you size that material separately.
Quick Start (60 Seconds)

- Wall Length (ft): Measure the full horizontal run of the wall from end to end. Curves and corners add length; straight runs are straightforward. Enter this in feet, not inches.
- Wall Height (ft): Enter the exposed height only -- the distance from finished grade at the front of the wall to the top surface. Do not include the buried base course; the calculator adds that separately.
- Block Length (in): The face length of a single block as printed on the manufacturer's spec sheet, typically 12 or 16 inches for standard retaining wall units.
- Block Height (in): The height of one block course, typically 4, 6, or 8 inches depending on the unit. Do not confuse nominal size with actual size; use the actual dimension when available.
- Capstone (Yes/No): Select Yes if your design includes a cap unit along the top. Capstones are calculated as a linear foot quantity equal to wall length, which you will then convert to a unit count using your supplier's capstone piece length.
- Common input mistake: Entering wall height including the buried course produces a double count. The calculator already accounts for the base row -- enter above-grade height only.
- Unit check: Wall dimensions go in feet; block dimensions go in inches. Mixing units is the fastest way to generate a wildly incorrect block count.
Inputs and Outputs (What Each Field Means)
| Field | Unit | What It Means | Common Mistake | Safe Entry Guidance |
|---|---|---|---|---|
| Wall Length | Feet | Total horizontal distance the wall spans from end to end | Forgetting to add length for returns and corners | Measure along the face of the wall; add corner returns separately |
| Wall Height | Feet | Exposed above-grade height from finished ground level to wall top | Including the buried base row in the measurement | Measure from final front-of-wall grade; the calculator adds one buried row automatically |
| Block Length | Inches | Face length of one block unit as measured or from the spec sheet | Using nominal length instead of actual length | Confirm actual dimension from manufacturer; nominal and actual can differ by 0.375 in |
| Block Height | Inches | Height of one course (row) of blocks | Using the block body height without accounting for any integral lip | Check the spec sheet for the course height, which may differ from the block body height |
| Capstone (Yes/No) | N/A | Whether a cap unit is installed on the top course | Selecting No and then buying caps without a count | Select Yes to get a linear foot quantity; divide by your capstone unit length to find piece count |
| Total Blocks (output) | Count | Visible wall blocks plus the buried base course row | Treating this as the final order quantity without adding a waste allowance | Add 5 to 10 additional blocks per 100 for cuts and breakage before placing an order |
| Capstone Linear Feet (output) | Linear feet | The length of capstone material needed, equal to wall length | Confusing linear feet with block count | Divide linear feet by the individual capstone unit length (in feet) to get piece count |
Worked Examples (Real Numbers)
Example 1: Small Garden Bed Edging Wall
- Wall Length: 20 ft
- Wall Height: 2 ft (exposed)
- Block Size: 12 in length, 4 in height
- Capstone: No
Face area = 20 x 2 = 40 sq ft. Block face area = (12/12) x (4/12) = 1 x 0.333 = 0.333 sq ft. Visible blocks = 40 / 0.333 = 120. Buried base course = 20 / 1 = 20 blocks. Total = 140 blocks, 6 visible rows plus 1 buried row.
Result: 140 blocks total. At this height, no engineering review is required, and a standard compacted gravel base layer behind the wall is sufficient for drainage.
Example 2: Mid-Height Landscape Terrace with Capstone
- Wall Length: 40 ft
- Wall Height: 3 ft (exposed)
- Block Size: 16 in length, 6 in height
- Capstone: Yes
Face area = 40 x 3 = 120 sq ft. Block face area = (16/12) x (6/12) = 1.333 x 0.5 = 0.667 sq ft. Visible blocks = 120 / 0.667 = 180. Buried base course = 40 / 1.333 = 30 blocks. Total = 210 blocks, 6 visible rows plus 1 buried row. Capstone quantity = 40 linear feet.
Result: 210 blocks plus 40 linear feet of capstone. This wall sits at the point where local drainage management becomes important; the slope of the grade behind it affects long-term stability significantly.
Example 3: Taller Terrace Wall at the Engineering Threshold
- Wall Length: 60 ft
- Wall Height: 4 ft (exposed)
- Block Size: 12 in length, 4 in height
- Capstone: Yes
Face area = 60 x 4 = 240 sq ft. Block face area = 1 x 0.333 = 0.333 sq ft. Visible blocks = 240 / 0.333 = 720. Buried base course = 60 / 1 = 60 blocks. Total = 780 blocks, 12 visible rows plus 1 buried row. Capstone quantity = 60 linear feet.
Result: 780 blocks plus 60 linear feet of capstone. At 4 ft of exposed height, this wall is at the upper boundary of what most residential codes allow without a permit or engineered design. Check local requirements before proceeding.
Reference Table (Fast Lookup)
| Wall (L x H) | Block Size (L x H in) | Visible Rows | Visible Blocks | Base Course Blocks | Total Blocks |
|---|---|---|---|---|---|
| 20 ft x 2 ft | 12 x 4 | 6 | 120 | 20 | 140 |
| 30 ft x 2 ft | 12 x 4 | 6 | 180 | 30 | 210 |
| 40 ft x 3 ft | 12 x 4 | 9 | 360 | 40 | 400 |
| 40 ft x 3 ft | 16 x 6 | 6 | 180 | 30 | 210 |
| 50 ft x 3 ft | 16 x 6 | 6 | 225 | 38 | 263 |
| 50 ft x 4 ft | 12 x 4 | 12 | 600 | 50 | 650 |
| 60 ft x 4 ft | 16 x 6 | 8 | 360 | 45 | 405 |
| 80 ft x 4 ft | 16 x 8 | 6 | 360 | 60 | 420 |
All values are computed from the formula: visible blocks = ceil(face area / block face area); base course = ceil(wall length / block length in feet). Add 5 to 10 additional blocks per 100 for on-site cuts and breakage.
How the Calculation Works (Formula + Assumptions)

Show the calculation steps
Step 1: Wall face area.
Face Area (sq ft) = Wall Length (ft) x Wall Height (ft)
This is the exposed surface area of the wall front. Height used here is above-grade height only.
Step 2: Block face area.
Block Face Area (sq ft) = [Block Length (in) / 12] x [Block Height (in) / 12]
Block dimensions are converted from inches to feet before multiplication. The result is the face area of one block unit.
Step 3: Visible wall blocks.
Visible Blocks = ceil(Face Area / Block Face Area)
Ceiling rounding is applied because partial blocks require a full unit. This count covers every row from grade level to the top of the wall.
Step 4: Buried base course.
Base Course Blocks = ceil(Wall Length (ft) / [Block Length (in) / 12])
One full additional row is set below final grade as the structural foundation course. This row is not visible in the finished wall but is critical to wall stability.
Step 5: Total block count.
Total = Visible Blocks + Base Course Blocks
This is the minimum quantity before applying a waste factor.
Step 6 (if capstone selected): Capstone linear feet.
Capstone LF = Wall Length (ft)
Capstones run the full length of the top course. Convert to piece count by dividing linear feet by the individual capstone unit length (in feet).
Rounding rule: All block counts use ceiling (round up to the next whole number) because fractions of blocks cannot be purchased as fractions. Capstone is reported as a linear foot measurement, which you then convert to piece count using your specific capstone size.
Assumptions and Limits
- The wall is straight. Curved walls require additional blocks at the convex face and fewer at the concave face; the formula does not account for this geometry.
- One buried row is assumed sufficient for the base course. Walls on unstable soil, expansive clay, or with high hydrostatic pressure may require a deeper foundation trench and additional buried rows.
- No waste factor is built into the calculated total. Field cuts, chipping, and defective units typically add 5 to 10 additional blocks per 100 to the order quantity.
- Block dimensions used are face dimensions only. The calculator does not account for block depth (front-to-back dimension), which affects material weight and structural design but not block count.
- The formula assumes full blocks with no openings, pilasters, or decorative cut patterns. Any design element that removes or adds face area will affect the actual count.
- The 4 ft height threshold for engineering review is a general guideline common in residential building codes in the United States; local requirements vary and must be confirmed with your municipality.
- Capstone units are assumed to span the full length without end cuts. Corner capstone pieces and cut returns are not included in the linear foot calculation.
Standards, Safety Checks, and "Secret Sauce" Warnings
Critical Warnings
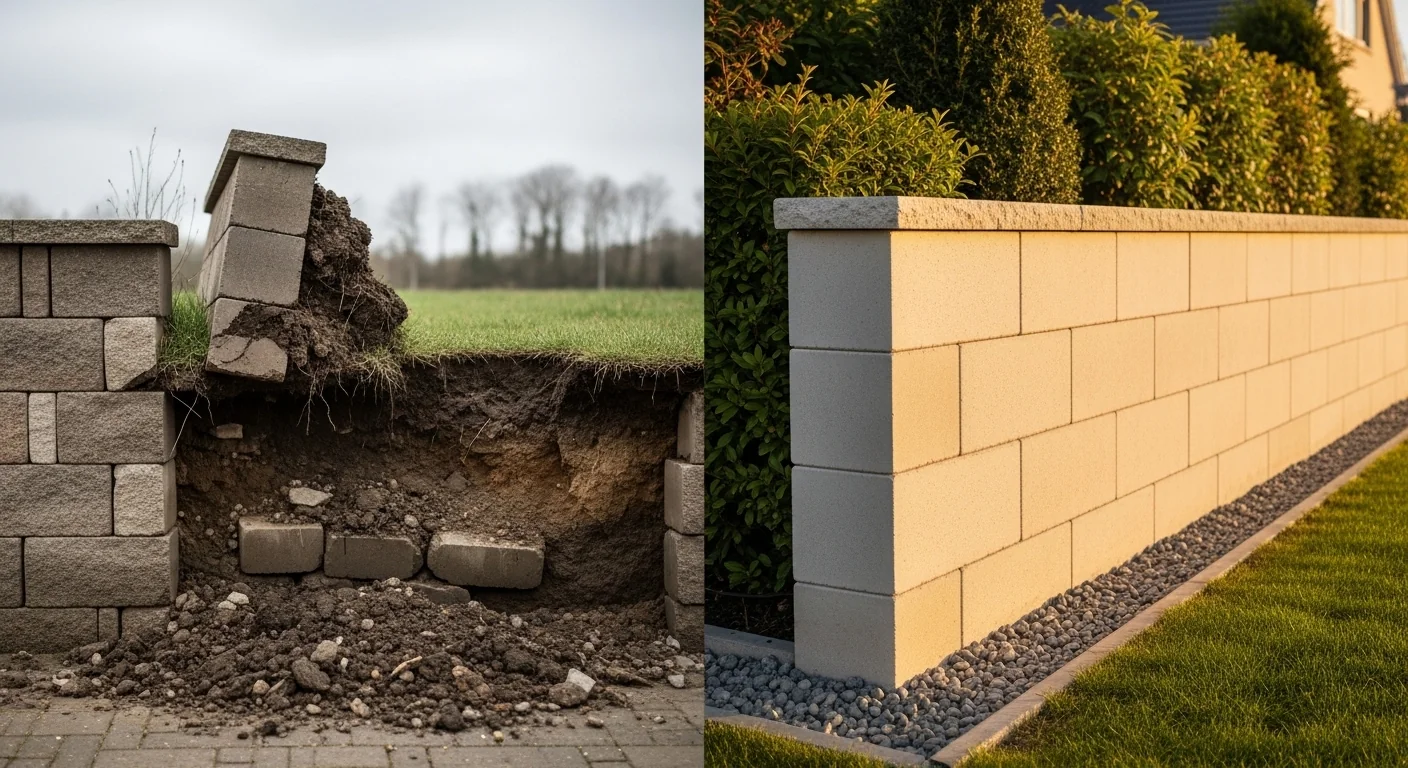
- Never omit the buried base course. The base row is set below grade into a compacted gravel bed. Without it, the wall has no secure footing and is vulnerable to shifting, tilting, or overturning under soil pressure. The calculator includes it automatically; if you are working from a manual estimate, add one full row of blocks to your count before ordering.
- Above-grade height and total height are not the same number. A wall that appears 3 ft tall above grade is actually 3 ft plus one block height in total structure. Entering total excavation depth instead of exposed height inflates your calculation by one row count on top of the automatic base addition.
- Walls above 4 ft of exposed height are in structural engineering territory. The calculator flags this threshold with a warning. Material count alone is not sufficient information for a wall of this scale; soil bearing capacity, hydrostatic pressure, drainage design, and geogrid placement all require professional evaluation. For projects that include geogrid reinforcement layers, the geogrid retaining wall calculator handles that layer spacing and quantity separately.
- Drainage failure is the leading cause of retaining wall collapse, not block quantity shortages. The calculation tells you how many blocks you need; it says nothing about drainage aggregate, filter fabric, or outlet pipe. Sizing the drainage layer behind the wall requires separate planning.
Minimum Standards
- Base course depth: Set the first row of blocks at a minimum of 1 inch below grade per foot of wall height, with a minimum of 4 inches total excavation below finish grade.
- Base preparation: A compacted gravel base of at least 6 inches under the first course is standard practice for residential landscape block walls. Concrete footings are required in some frost-heave climates; check local codes.
- Wall batter: Most landscape block systems specify a setback (lean into the hillside) per course. Follow the manufacturer's setback specification, typically 1 inch per foot of wall height for segmental retaining wall units.
- Permits: Walls exceeding 4 ft of retained height (not exposed height) typically require a building permit in most U.S. jurisdictions, regardless of exposed height. If your project involves grade changes on adjacent property, a survey and permit are strongly advisable. For related hardscape work, using a stair riser calculator ensures any integrated steps meet code-compliant rise and run dimensions.
Competitor Trap: Most retaining wall block calculators divide face area by block face area and stop there. That calculation gives you the count for the visible wall only. When the first buried row is missing from the estimate and the order, the crew runs short on the first day of installation, before the wall is even above grade. This is not a minor adjustment -- for a 50 ft wall using 12x4 blocks, the omitted base course represents 50 additional blocks, roughly a full pallet depending on block weight and pallet configuration. This tool includes that row by design.
Common Mistakes and Fixes
Mistake: Measuring total wall height instead of exposed height
The calculator uses exposed (above-grade) height to compute the visible face area and then adds the buried base course automatically. If you measure from the bottom of the excavation to the top of the wall, you include the buried row in your height input and the calculator adds another buried row on top of that, producing a count that is one full row too high. Fix: measure from final finished grade at the front face of the wall to the intended wall top, and enter that distance only.
Mistake: Ignoring block size variation within a product line
Landscape block manufacturers sell standard and jumbo sizes, half blocks, corner units, and capstones under the same product line. The calculator accepts one block size for the field units. If your design mixes 12 in and 16 in units in different courses, the average face area does not represent either unit accurately. Fix: run the calculator separately for each zone of consistent block size, then sum the results.
Mistake: Treating the block count output as the purchase order quantity
The calculated total represents the theoretical minimum with no allowance for on-site cuts, edge courses that require splitting, or incidental breakage during handling. Placing an order for exactly the calculated quantity will almost certainly leave the project short of material. Fix: add 5 to 10 additional units per 100 calculated blocks, or follow your block supplier's waste recommendation for the specific product. For related base material, the paver base calculator can help size the compacted aggregate layer under the first course.
Mistake: Calculating capstone count from linear feet without unit conversion
The calculator returns capstone material as linear feet equal to wall length. Capstone units are sold as individual pieces, not by the foot. A capstone that is 16 in long covers 1.333 ft of wall per piece. Ordering 40 capstone units for a 40 ft wall using 16 in caps leaves the project about 10 pieces short. Fix: divide linear feet by the capstone piece length in feet to get the piece count, then add a cut allowance. Filling joints between capstones with a stabilizing material is a separate step; the polymeric sand calculator can size that material for the project.
Mistake: Planning drainage after block placement has started
Drainage aggregate, filter fabric, and outlet pipes must be installed as the wall rises, not as an afterthought once the wall is complete. Retroactively adding drainage behind a completed wall requires partial demolition. Fix: plan drainage layer thickness and aggregate quantity before the first block goes in. The gravel volume needed behind a wall grows significantly with wall height, and it affects the excavation width and total material cost from day one.
Next Steps in Your Workflow
Once you have a block count with your waste factor added, the next step is to confirm the base preparation requirements for your specific soil type and climate. In frost-prone regions, the first block course may need to be set below frost depth, which changes the excavation requirement substantially. At the same time, plan the drainage layer. The volume of aggregate behind the wall, the filter fabric area, and the outlet pipe length are separate material estimates that affect both the project budget and the excavation timeline. For walls with retained height above 4 ft, consult a structural engineer before finalizing the block quantity or wall cross-section. The geogrid retaining wall calculator can help you quantify reinforcement layers if your engineer specifies them.
For the broader site, the hardscape work around a retaining wall often involves grading, slope management, and drainage routing beyond the wall itself. If the wall is part of a patio or walkway project, a patio slope calculator can help verify that adjacent paved surfaces drain away from the structure at the correct grade. Coordinate your block delivery timing with the base preparation and excavation schedule so material is on site when needed without sitting exposed to weather on a staging area for extended periods.
FAQ
Why does the calculator add a buried row automatically?
The buried base course is a structural requirement for segmental retaining wall systems. This first row is set into a compacted gravel bed below grade and provides the footing that resists forward rotation and sliding under soil pressure. Without it, the wall lacks a stable foundation. Industry installation guidelines for segmental block systems universally require at least one buried row, typically at a depth proportional to wall height.
What is the difference between wall height and retained height?
Wall height (exposed height) is the visible distance from finished grade at the front of the wall to the top of the wall. Retained height is the total vertical distance the wall holds back, including the buried portion. For permit and engineering purposes, retained height is typically the governing dimension. For block quantity calculations, exposed height is used, with the buried course added separately.
How do I convert capstone linear feet to a piece count?
Divide the linear feet result by the length of one capstone unit expressed in feet. A capstone that measures 12 in (1 ft) long covers 1 ft per piece. A 16 in capstone covers 1.333 ft per piece. For a 40 ft wall with 16 in capstones: 40 / 1.333 = 30 pieces, rounded up to the next whole number. Add a cut allowance for corners and end conditions.
Can I use this calculator for curved retaining walls?
The calculator is designed for straight wall runs. For curved walls, use the arc length of the wall as your length input rather than a straight-line chord measurement. Block coverage on the convex face requires additional units compared to a straight wall because blocks must be angled or cut at joints. A straight-wall calculation will undercount blocks for a curved installation; add an additional waste allowance to compensate.
What block sizes does this calculator support?
Any block size with a length between 1 and 48 inches and a height between 1 and 24 inches can be entered. Common residential landscape block sizes include 12x4, 16x6, and 16x8 inches. Verify the actual (not nominal) dimensions from the manufacturer's specification sheet, since some products list nominal dimensions that differ from the physical block size used in course height calculations.
Does the result include the gravel base or backfill material?
No. The calculator outputs block count and capstone linear footage only. The compacted gravel base under the first course, the drainage aggregate backfill behind the wall, and any filter fabric are separate material estimates. Gravel volume depends on wall length, wall height, aggregate layer thickness, and trench width, all of which vary by soil type and design specification.
Conclusion
A retaining wall block calculator that returns only visible face area divided by block area is giving you an incomplete number. The buried base course is not optional -- it is the structural anchor of the entire wall, and it represents a meaningful addition to the material quantity on any project of significant length. This tool calculates it automatically so the number you bring to the supplier counter reflects the actual scope of the installation, not just what will be visible when the job is done.
The single most consequential mistake in retaining wall material planning is treating the visible wall as the whole wall. Order for the total structure, including what goes below grade, and add a waste factor before placing the order. For projects that reach or exceed 4 ft of exposed height, block count is only one of several interdependent variables; at that scale, the wall's long-term performance depends as much on drainage design, geogrid reinforcement, and soil conditions as it does on the number of blocks installed. If your design has grown into that territory, the boulder weight calculator can assist with any large-stone elements integrated into the design.
Lead Data Architect
Umer Hayiat
Founder & Lead Data Architect at TheYieldGrid. I bridge the gap between complex agronomic data and practical growing, transforming verified agricultural science into accessible, mathematically precise tools and guides for serious growers.
View all tools & guides by Umer Hayiat →