Joint volume is the invisible variable in every paver installation. Two projects with identical square footage can require completely different amounts of polymeric sand depending on joint width, paver thickness, and paver dimensions. Get the math wrong by even a small margin and you either run short mid-job or activate an undersupplied bag by opening a second one too late. The real cost is not in extra bags. It is in the activation chemistry that happens the moment you mist water onto a surface that was not properly cleared.
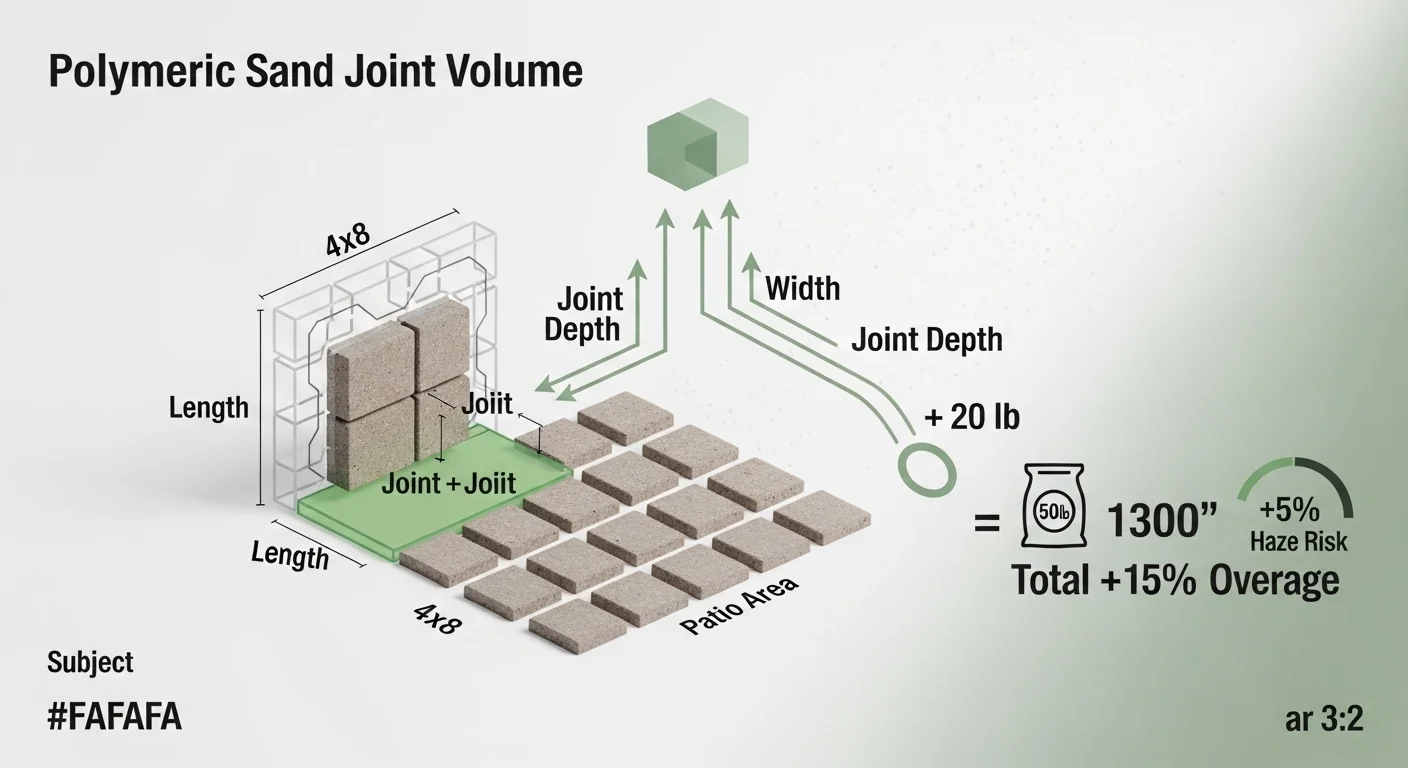
This tool computes the total joint volume in cubic inches for your specific paver layout, then converts that volume into 50 lb bag counts using a yield of 1,300 cubic inches per bag. It also calculates a 15% overage recommendation and a haze risk rating derived from joint width. What it does not do is account for curved edges, mixed paver patterns, or installers who skip the leaf blower step.
After running the calculator, you will know exactly how many bags to purchase and which of three haze risk categories your joint width puts you in, giving you a concrete decision point before you open a single bag.
Use the Tool

Polymeric Sand Calculator
The Yield GridHow This Calculator Works
Step 1: Calculate the area of one paver: Paver Area = Length x Width (in square inches).
Step 2: Calculate the joint area around one paver: Joint Area = ((Length + Joint Width) x (Width + Joint Width)) - Paver Area. This is the sand-filled area surrounding each paver.
Step 3: Calculate joint volume per paver: Joint Volume = Joint Area x Depth (in cubic inches).
Step 4: Count total pavers: Total Pavers = Total Area (sq in) / (Length + Joint) x (Width + Joint).
Step 5: Total sand volume: Total Volume = Joint Volume per Paver x Total Pavers.
Step 6: Convert to bags: Bags = Total Volume / 1,300 cu in. A standard 50 lb bag of polymeric sand yields approximately 1,300 cubic inches of fill.
Assumptions: Uniform joint width on all sides. Yield per 50 lb bag = 1,300 cu in (industry standard). Results rounded up to nearest whole bag.
Assumptions & Limits
This calculator assumes a uniform joint width on all four sides of each paver. Real-world layouts (herringbone, basket weave, running bond) may have slight variations in joint count per square foot. Results should be treated as a close estimate.
The 1,300 cubic inch yield per 50 lb bag is an industry average for polymeric sand products such as Alliance Gator Maxx G2. Actual yield varies by compaction, moisture, and product brand. Always buy 10-15% extra.
Joint depth is assumed equal to paver thickness. If you set the sand bed lower than the paver surface (recommended: 1/8″ below top), reduce the depth input accordingly.
Maximum supported area: 50,000 sq ft. Maximum paver dimension: 48 inches. Minimum joint width: 1/8 inch.
This tool does not account for cuts at edges, circular patterns, or mixed-size paver layouts. For complex patterns, calculate each section separately.
Before entering values, have your paver dimensions in inches, the joint width spec from the manufacturer or your design plan, and a tape-measured patio area in square feet. If you are working from architectural drawings, convert square footage from the plan rather than estimating. Joint depth should match paver thickness in most installations; reduce it by 1/8 inch only if you intend to set the sand bed slightly below the paver surface. For projects that include a base layer calculation, the paver base calculator pairs directly with this tool and handles the compacted gravel depth math separately.
Quick Start (60 Seconds)
- Paver Size: Select the closest preset or choose “Custom Size” and enter length and width separately in inches. Do not use feet here; all dimensions are in inches.
- Joint Width: This is the gap between adjacent pavers, not the paver edge thickness. Common residential installations use 1/4 inch. Do not guess; measure from a sample or check your layout design spec.
- Joint Depth: Typically equals paver thickness. Standard Holland Stone pavers are 2.375 inches thick. Flagstone varies. If you are filling only part of the joint depth, enter the actual fill depth, not the paver thickness.
- Total Patio Area: Enter in square feet. Multiply length by width for rectangular areas. For irregular shapes, break the area into rectangles, calculate each, and add them together before entering the total.
- Custom Paver: Appears only when “Custom Size” is selected. Enter both length and width; the tool computes paver area from the product of both dimensions.
- Run the calculation only when all fields are filled. Partial inputs produce no output; this is by design to prevent relying on an incomplete estimate.
- Check the haze risk rating first before looking at bag count. If your joint width triggers a high-risk or moderate-risk flag, plan your application process accordingly before ordering materials.
Inputs and Outputs (What Each Field Means)
| Field | Unit | What It Means | Common Mistake | Safe Entry Guidance |
|---|---|---|---|---|
| Paver Size | inches | The face dimensions of one paver, length by width | Selecting a preset that does not match actual paver size; nominal vs actual dimensions differ | Measure a paver face directly; nominal 4×8 is often exactly 4″ x 8″ but verify before entering |
| Custom Paver Length | inches | Length of one paver when no preset matches | Entering feet instead of inches; a 1-foot paver becomes 1 instead of 12 | Range: 1 to 48 inches. Convert all dimensions to inches before entry. |
| Custom Paver Width | inches | Width of one paver when no preset matches | Entering the same value for length and width for non-square pavers | Width must be less than or equal to length; orientation does not matter mathematically |
| Joint Width | inches | The gap between adjacent pavers on all sides | Using the grout line size from a tile project; paver joints are typically wider and deeper | Select the closest option; if between two values, select the wider to avoid underbuying |
| Joint Depth | inches | How deep the joint is filled with polymeric sand; equals paver thickness in most cases | Entering the depth of the entire base assembly rather than just the paver thickness | Range: 0.5 to 6 inches. For standard 60mm (2.375″) pavers, use 2.375. For 80mm pavers, use 3.15. |
| Total Patio Area | sq ft | Total surface area covered by pavers, including joint spaces | Measuring only the paved surface and forgetting to include border or step areas | Range: 1 to 50,000 sq ft. For driveways, include all lanes, aprons, and turnarounds. |
| Bags Needed (output) | 50 lb bags | Minimum whole bags required; always rounded up from the decimal result | Buying exactly the minimum and running out because of paver cuts adding extra joint exposure | Always buy the +15% overage quantity shown in the breakdown table |
| Haze Risk (output) | Low / Moderate / High | Risk of permanent polymeric haze based on joint width and the activated cement reaction | Ignoring the risk rating because the day is sunny; dew and humidity matter as much as rain | Read the warning text for your risk level before touching the bags; process adjustments differ by tier |
Worked Examples (Real Numbers)
Scenario 1: Small Backyard Patio with Holland Stone (150 sq ft)
- Paver size: 4″ x 8″
- Joint width: 1/4″ (0.25″)
- Joint depth: 2.375″
- Total area: 150 sq ft
Paver area = 32 sq in. Cell area (paver + joint) = 4.25 x 8.25 = 35.06 sq in. Joint area = 3.06 sq in. Total pavers = (150 x 144) / 35.06 = 616. Joint volume per paver = 3.06 x 2.375 = 7.27 cu in. Total volume = 7.27 x 616 = 4,478 cu in. Bags = 4,478 / 1,300 = 3.44, rounded up to 4.
Result: 4 bags (minimum); 5 bags with overage
For a typical weekend project, 4 to 5 bags fits in one vehicle load. At this joint width, haze risk is moderate; a leaf blower sweep before misting is non-optional.
Scenario 2: Large 16″x16″ Flagstone Driveway Apron (400 sq ft)
- Paver size: 16″ x 16″
- Joint width: 3/8″ (0.375″)
- Joint depth: 3.0″
- Total area: 400 sq ft
Paver area = 256 sq in. Cell area = 16.375 x 16.375 = 268.14 sq in. Joint area = 12.14 sq in. Total pavers = (400 x 144) / 268.14 = 214.8. Joint volume per paver = 12.14 x 3.0 = 36.42 cu in. Total volume = 36.42 x 214.8 = 7,824 cu in. Bags = 7,824 / 1,300 = 6.02, rounded up to 7.
Result: 7 bags (minimum); 9 bags with overage
Deeper joints on large pavers accumulate significant volume even with relatively few pavers. The moderate haze risk at 3/8″ still requires thorough surface blowing before any water contact.
Scenario 3: Narrow 6″x9″ Garden Walkway with Tight Joints (80 sq ft)
- Paver size: 6″ x 9″
- Joint width: 1/8″ (0.125″)
- Joint depth: 2.375″
- Total area: 80 sq ft
Paver area = 54 sq in. Cell area = 6.125 x 9.125 = 55.89 sq in. Joint area = 1.89 sq in. Total pavers = (80 x 144) / 55.89 = 206.1. Joint volume per paver = 1.89 x 2.375 = 4.49 cu in. Total volume = 4.49 x 206.1 = 925 cu in. Bags = 925 / 1,300 = 0.71, rounded up to 1.
Result: 1 bag (minimum); 2 bags with overage
Tight 1/8″ joints require the least material but create the highest haze risk. Surface sand removal on a narrow joint walkway is more difficult because the broom tends to push sand back out of joints onto paver faces. Budget extra blowing time.
Reference Table (Fast Lookup)
| Paver Size | Joint Width | Depth (in) | Area (sq ft) | Bags (min) | Bags (+15% overage) |
|---|---|---|---|---|---|
| 4″ x 8″ | 1/4″ | 2.375 | 100 | 3 | 4 |
| 4″ x 8″ | 1/4″ | 2.375 | 200 | 5 | 6 |
| 4″ x 8″ | 1/2″ | 2.375 | 200 | 9 | 11 |
| 6″ x 6″ | 1/4″ | 2.375 | 150 | 4 | 5 |
| 6″ x 9″ | 1/4″ | 2.375 | 150 | 3 | 4 |
| 12″ x 12″ | 3/8″ | 2.375 | 250 | 4 | 5 |
| 16″ x 16″ | 3/8″ | 3.0 | 300 | 5 | 6 |
| 12″ x 24″ | 1/2″ | 2.375 | 200 | 4 | 5 |
| 4″ x 8″ | 1/8″ | 2.375 | 100 | 1 | 2 |
| 16″ x 16″ | 1/2″ | 3.0 | 500 | 11 | 13 |
Note: Larger pavers with wider joints produce more joint volume per unit area. The 4″x8″ pattern at 1/2″ joints requires nearly twice the material of the same area at 1/4″ joints because the perimeter-to-area ratio increases with joint width.
How the Calculation Works (Formula + Assumptions)

Show the calculation steps
Step 1 — Paver Area: Multiply paver length by paver width (both in inches). Result is in square inches. Example: 4″ x 8″ = 32 sq in.
Step 2 — Cell Area: Add the joint width to both the length and the width, then multiply. This produces the area of the repeating unit (one paver plus its surrounding joints). Example: (4 + 0.25) x (8 + 0.25) = 4.25 x 8.25 = 35.06 sq in.
Step 3 — Joint Area per Paver: Subtract the paver area from the cell area. This isolates the sand-filled space around one paver. Example: 35.06 – 32 = 3.06 sq in.
Step 4 — Total Paver Count: Convert the total project area to square inches (multiply by 144), then divide by the cell area. Example: (200 sq ft x 144) / 35.06 = 821 pavers.
Step 5 — Total Joint Volume: Multiply joint area per paver by joint depth, then by total paver count. Result is in cubic inches. Example: 3.06 x 2.375 x 821 = 5,970 cu in.
Step 6 — Bag Count: Divide total joint volume by 1,300 (cubic inches per 50 lb bag). Round up to the nearest whole bag. Example: 5,970 / 1,300 = 4.59, rounded up to 5 bags.
Rounding rule: All intermediate values are kept at full decimal precision. Only the final bag count is rounded up using ceiling rounding. This prevents systematic underestimation.
Unit conversion: Square footage is converted to square inches by multiplying by 144 (12 inches per foot, squared). All geometry stays in square or cubic inches throughout to avoid conversion errors.
Assumptions and Limits
- Joint width is uniform on all four sides of every paver. Herringbone and basket weave patterns share similar joint geometry, but irregular flagstone layouts may have variable gaps that require field averaging.
- Yield of 1,300 cubic inches per 50 lb bag is an industry average. Premium products like Alliance Gator Maxx G2 may yield slightly more; budget or off-brand sands may yield less. Contact manufacturer documentation for exact yield data.
- Joint depth equals paver thickness throughout. Partially filled joints (set 1/8″ below surface) should use the actual fill depth, not the paver thickness.
- The calculation does not account for pavers cut at edges. Cut pieces expose more joint perimeter per square foot. Add 5 to 10 extra bags for complex border work or heavy diagonal patterns.
- Maximum supported area is 50,000 sq ft. Maximum paver dimension is 48 inches. Minimum joint width is 1/8 inch (below this, polymeric sand is not recommended by most manufacturers).
- The haze risk rating is based on joint width thresholds derived from product chemistry guidelines, not from empirical testing of specific brands. Actual risk also depends on weather, humidity, application technique, and blower power.
- Mixed paver patterns or multiple paver sizes on one project should be broken into zones. Run the calculator separately for each zone and add bag totals together.
Standards, Safety Checks, and “Secret Sauce” Warnings
Critical Warnings
- Polymeric haze is chemically permanent. Polymeric sand contains Portland cement and synthetic polymers that activate on contact with water. If any grains remain on the paver surface when you mist the installation, the cement bonds to the paver face. Standard cleaning products will not remove it. The only remediation is a dedicated polymeric haze dissolver applied immediately after the error is noticed, before the cement fully cures. If the bond fully cures, mechanical removal or paver replacement are the only options.
- Morning dew triggers activation just as effectively as rain. Surface dryness checks must happen minutes before application, not hours before. A surface that feels dry at 8:00 AM may have been dew-covered at 6:00 AM, and residual moisture trapped in the joint can still activate the binder. The rule is to apply polymeric sand only on surfaces that have been in direct sun and wind for at least 30 minutes. If you have any doubt, check with a dry cloth pressed to the paver surface.
- A gas or electric blower below 500 CFM will not adequately clear paver faces. Low-powered handheld blowers move sand around rather than ejecting it. The minimum for effective surface clearing is 500 CFM; a 600 CFM gas blower is the practical standard for professional installations. The blower must be held nearly parallel to the surface, not aimed straight down, to create horizontal airflow across paver faces.
- Do not apply in rain or if rain is forecast within 24 hours. Check your forecast before opening the first bag. Premature rain washes sand out of joints before compaction and can create runoff staining on surrounding surfaces.
Minimum Standards
- All paver surfaces must be dry and dust-free before application. Sweep once with a 24-inch push broom, blow with a high-CFM blower, then visually inspect each paver face before misting.
- Compact sand into joints with a plate compactor (or hand tamper for small areas) before blowing. Loose surface sand is harder to clear than sand that has been seated into the joint.
- Mist the installation with a fine spray, never a direct stream. The goal is to wet the sand without displacing it. Two light misting passes separated by 15 minutes produce better activation than one heavy pass.
- Allow a minimum of 24 hours before foot traffic and 72 hours before vehicle traffic on driveways, regardless of weather conditions.
Competitor Trap: Many guides on polymeric sand installation focus entirely on bag quantity and gloss over the activation chemistry. Some suggest using a garden hose set to “mist” without specifying blower CFM requirements or dew risk timing. This is the single most common reason DIY paver projects develop permanent haze. A thorough joint volume calculation is only half the job. The application protocol, especially the surface clearing step, determines whether the result is a clean hardscape or a $500 remediation project.
If your project includes grade changes or drainage planning alongside the paver work, reviewing the patio slope calculator before installation helps confirm that surface water will not pool at joint locations, which compounds the moisture risk on newly applied polymeric sand.
Common Mistakes and Fixes
Mistake: Selecting the Wrong Joint Width
Joint width is often approximated from memory rather than measured. A project designed for 1/4″ joints may end up installed at 3/8″ because paver installation spacers vary by brand. A single 1/8″ difference in joint width on a 200 sq ft project can add 3 to 4 bags to the required quantity. Measure the actual installed joint width with a tape before ordering sand.
Fix: Lay out a dry test area of 4 to 6 pavers with spacers in place and measure the resulting joint width directly before ordering material.
Mistake: Using Paver Thickness Instead of Fill Depth
Experienced installers typically set the finished sand level 1/8 to 3/16 inch below the paver surface to allow for a small compaction reserve. Entering the full paver thickness as joint depth overestimates volume by roughly 5 to 8 percent. On a large project, this adds cost without adding accuracy.
Fix: If you plan to leave a surface gap, reduce the depth input by the intended gap measurement. For most residential projects, 2.25 inches rather than 2.375 inches is more accurate for standard 60mm pavers.
Mistake: Not Accounting for Paver Cuts at Borders
Cut pavers along a border or diagonal pattern have more exposed joint perimeter per face area than full pavers. This is a systematic blind spot in any area-based calculator. The tool computes based on the repeating full-paver unit; border conditions are outside the formula. Installers consistently underorder when the project has a high perimeter-to-interior ratio, such as narrow pathways or complex-shaped patios. The paver sealer calculator presents a similar coverage issue for sealer quantities after the joints are set.
Fix: Add one bag for every 40 linear feet of border cut, or add a flat 10 percent to the total bag count for projects with complex shapes.
Mistake: Skipping Compaction Before Surface Clearing
Sweeping sand into joints and immediately blowing the surface creates a situation where the blower removes sand from the joint top along with the surface overspray. Joint fill levels drop and coverage gaps appear after the first rain. Compaction seats the sand below the blower’s ejection threshold, so surface clearing only removes the loose overfill.
Fix: Compact once with a plate compactor after initial sweeping, top off any joints that settled below target depth, then blow. Repeat the top-off and blow cycle once more before misting.
Mistake: Treating the Bag Count as the Whole Answer
Calculating the correct number of bags and stopping there is the most common setup for a failed installation. Polymeric sand quantity is the input to the process, not the process itself. A project with a perfectly sized order can still produce permanent haze if the application sequence is wrong, the weather window is missed, or the blower CFM is insufficient. The quantity answer must be paired with an application plan. For projects that include adjacent gravel base work, checking base material quantities with the gravel calculator at the same planning stage prevents the common error of calculating sand but forgetting to verify base depth.
Fix: Schedule application day based on weather, assemble blower and broom equipment in advance, and review the misting protocol before opening the first bag.
Next Steps in Your Workflow
After confirming your bag count, the next planning step is material staging. Polymeric sand bags are heavy (50 lbs each) and should be staged near the project edge, not stacked on the paver surface where weight can disturb the setting bed. If your project involves multiple zones (patio, walkway, steps), calculate each zone separately and label bags by zone before starting. This prevents running short on one area because excess was used in another.
For projects where the paver installation connects to other hardscape elements, the surrounding geometry matters. A retaining wall backing a paved patio changes drainage behavior and may affect how moisture accumulates near the joint zone. The retaining wall calculator covers that scope if your project includes one. For walkway extensions or stepping stone transitions, the stepping stone calculator handles spacing and quantity for natural stone insets that connect to a primary paver field.
FAQ
How many bags of polymeric sand do I need for 100 square feet?
It depends on paver size and joint width. For a common 4″ x 8″ paver with 1/4″ joints at 2.375″ depth, 100 square feet requires approximately 3 bags. Wider joints or smaller pavers increase the number. Use the calculator with your specific dimensions for an accurate result rather than relying on a rule of thumb.
What is the yield of one 50 lb bag of polymeric sand?
The standard industry yield used for planning purposes is 1,300 cubic inches per 50 lb bag. This is an average across major brands. Actual yield may vary by product formulation, compaction method, and joint geometry. Premium products marketed for tight joints sometimes state slightly different yields in their technical data sheets; always check the manufacturer spec when available.
Can I use polymeric sand in joints smaller than 1/8 inch?
Joints below 1/8 inch are generally not recommended for polymeric sand. Most manufacturers specify a minimum joint width of 1/8 inch because narrower gaps do not allow adequate sand penetration or compaction. Very tight joints also make surface clearing nearly impossible, which almost guarantees permanent haze. For joints smaller than 1/8 inch, a fine kiln-dried jointing sand is the typical alternative.
What causes polymeric sand haze and how do I prevent it?
Polymeric haze forms when Portland cement in the sand activates on the paver surface rather than only inside the joint. This happens when sand grains remain on the paver face during misting. Prevention requires two things: a thorough high-CFM leaf blower sweep to remove all surface particles before any water contact, and confirming that the paver surface is completely dry with no dew or residual moisture before application begins.
How long does polymeric sand take to cure?
Most polymeric sand products reach sufficient hardness for foot traffic within 24 hours under normal conditions. Vehicle traffic should be held off for at least 72 hours. Full cure strength, which resists weed growth and ant intrusion effectively, typically develops over 7 to 10 days. Curing is faster in warm, dry conditions and slower in cool or humid weather. Do not expose the installation to rain during the first 24 hours.
Do I need to re-apply polymeric sand over time?
Polymeric sand joints can degrade over several years due to UV exposure, freeze-thaw cycling, and mechanical disturbance from pressure washing. When joints start showing cracks, erosion, or weed intrusion, cleaning out the old material and reapplying is the correct approach. Topping off a degraded joint without removing the old material rarely bonds well. Reapplication follows the same quantity calculation process as the original installation.
Conclusion
The polymeric sand calculator removes the guesswork from joint volume math, but the haze risk rating is the output that matters most to project outcomes. Bag count is a procurement decision. Haze risk is an installation protocol decision. Both answers come from the same set of inputs, and treating one as optional is the most common reason a correctly quantified project still produces a damaged surface.
The single mistake to avoid above everything else is misting before blowing. The order is non-negotiable: sweep, compact, blow, inspect, mist. Any step out of sequence creates a permanent problem that no additional calculation can fix. Plan the quantity, confirm the risk level, and then invest as much attention in the application day as in the material order. For a complete picture of your paving project scope, the paver base calculator handles the foundation layer quantities that go in before the polymeric sand ever reaches the site.
Lead Data Architect
Umer Hayiat
Founder & Lead Data Architect at TheYieldGrid. I bridge the gap between complex agronomic data and practical growing, transforming verified agricultural science into accessible, mathematically precise tools and guides for serious growers.
View all tools & guides by Umer Hayiat →