The gap between two flagstones is not a design choice — it is a biomechanics problem. Human gait operates on a cadence the brain builds subconsciously. When the distance between footholds matches that cadence, walking feels effortless. When it does not, the brain fires a correction signal mid-stride that manifests as a visible stumble, a stutter-step onto soft ground, or an awkward leap that puts real strain on ankles and knees. Most stepping stone guides talk about aesthetics and materials. This page is about the math that determines whether your path is safe to walk on.
This stepping stone calculator computes the center-to-center spacing, the gap between each stone, and the total number of stones required for a pathway of any length. It applies a deterministic kinesiology-based threshold to flag dangerous spacing before installation happens. What it does not do: account for curved paths, side-by-side double rows, irregular or non-uniform stone shapes, or grade changes that shorten effective stride. Those variables require on-site professional measurement.
After running your numbers, you will know the exact gap your chosen stone size produces at your target stride length — and whether that gap crosses the 12-inch threshold where the stutter-step hazard activates. That one number changes your material order.
Use the Tool

Stepping Stone Stride Spacing Calculator
Find ergonomic center-to-center spacing for your garden pathway — avoid the stutter-step trip hazard.
| Center-to-Center (in) | Gap for 18″ Stone (in) | Total Stones (40 ft path) | Safety Rating |
|---|
How This Calculator Works
Assumptions & Limits
- Assumes casual walking pace (not running or hurried stride).
- Average casual stride is 22–26 inches center-to-center; 24″ is the widely cited ergonomic ideal.
- Stride suggestion is based on a general kinesiology formula (≈39% of height). Actual comfort varies by individual and age.
- Stone count uses ceiling rounding — it includes the end stone and accounts for a pathway start stone.
- Calculations do not account for curves, corners, or side-by-side double-stone rows.
- Gap thresholds: 0–6″ = comfortable; 6–12″ = marginal; >12″ = stutter-step hazard.
- Maximum pathway length: 1,000 ft. Maximum stone size: 48 in.
- This tool does not replace professional landscape design advice.
Before entering values, have four measurements ready: the total pathway length in feet (measure the walking line, not the shortest straight line), the primary user's height in inches, the intended stride length in inches (24 inches is the ergonomic starting point for most adults), and the largest dimension of your stone in inches. If you are comparing flagstone sizes, run the calculator once per stone dimension to see how gap changes. For projects where the base layer thickness affects final stone height relative to surrounding grade, see the paver base calculator before finalizing your material list.
Quick Start (60 Seconds)

- Total Pathway Length (ft): Measure the full walking line. For a curved path, walk a measuring tape along the actual route rather than measuring end-to-end. Enter the result in feet, not inches.
- Primary User Height (in): Enter the height of the person who will use the path most frequently, in inches. A person who is 5 feet 6 inches tall enters 66. The calculator uses this to suggest an ergonomic stride length automatically.
- Target Stride Length (in): This is the center-to-center distance you intend to use. The calculator pre-fills a suggestion based on height (approximately 39 percent of height in inches). You can override it. Do not confuse stride length with stone size -- stride is the distance between stone centers, not between edges.
- Stone Diameter / Length (in): Enter the largest footprint dimension of your stone in inches. For a round flagstone, use diameter. For a rectangular or irregular piece, use the longest dimension that will face the walking direction. Do not enter the stone's thickness here.
- Check the gap, not just the stone count: The gap result is the critical output. If it exceeds 12 inches, the spacing is in the trip hazard zone regardless of how good the total stone count looks.
- Run it twice if you are comparing stone sizes: A 12-inch stone at a 24-inch stride leaves a 12-inch gap -- right at the warning boundary. An 18-inch stone at the same stride leaves a 6-inch gap, which is safe. The stone size changes everything.
- Reset between scenarios: Use the Reset button to clear all fields before entering a new stone size or pathway length. This prevents accidental mixed-input calculations.
Inputs and Outputs (What Each Field Means)
| Field | Unit | What It Means | Common Mistake | Safe Entry Guidance |
|---|---|---|---|---|
| Total Pathway Length | Feet | The full walking distance of the path from start stone to end stone. | Measuring the straight-line distance instead of the curved walking route. | 1 to 1,000 ft. Walk the tape along the actual path line. |
| Primary User Height | Inches | Used to calculate the biomechanically appropriate stride suggestion for that individual. | Entering height in feet and inches as a decimal (e.g. 5.6 instead of 67). | 36 to 96 in. Convert feet + inches to total inches first. |
| Target Stride Length | Inches | The center-to-center placement distance between consecutive stones. | Confusing stride with gap -- stride is center-to-center, gap is the open space between stone edges. | 12 to 60 in. The ergonomic range for casual adult walking is 22 to 26 in. |
| Stone Diameter / Length | Inches | The widest footprint dimension of the stone in the direction of travel. | Using the stone thickness instead of the surface dimension. | 4 to 48 in. Use the longest edge that faces the walking direction. |
| Center-to-Center Spacing (output) | Inches | The distance from the center of one stone to the center of the next. Equal to your input stride length. | Treating this as the gap size when marking out stones in the yard. | Mark from center point to center point when laying out stones on site. |
| Gap Between Stones (output) | Inches | The open ground space between the edge of one stone and the edge of the next. This is the hazard variable. | Ignoring gap entirely and focusing only on total stone count. | Keep gap at 6 in or under for the safest, most natural walking experience. |
| Total Stones Needed (output) | Count | The number of stones required for the full path including start and end stones. | Forgetting to add a stone for the starting point -- the formula adds 1 above the division result. | Order 10 to 15 percent extra to account for breakage and irregular shapes. |
| Suggested Stride for Height (output) | Inches | The calculator's biomechanically derived stride recommendation based on the user's height (height x 0.39). | Ignoring the suggestion and defaulting to a round number without checking the resulting gap. | Use as a starting point. Adjust by 1 to 2 inches to keep gap in the safe zone for your stone size. |
Worked Examples (Real Numbers)
Example 1: Standard Suburban Garden Path
- Pathway length: 40 ft
- User height: 66 in (5 ft 6 in)
- Target stride: 24 in
- Stone diameter: 18 in
Result: Center-to-center spacing = 24 in. Gap between stones = 24 - 18 = 6 in. Total stones = ceil((40 x 12) / 24) + 1 = ceil(20) + 1 = 21 stones.
A 6-inch gap sits at the comfortable upper boundary of the safe zone. This layout will feel natural for most adult walkers and leaves enough room for a strip of creeping thyme between stones without creating a visual obstacle. At 24 inches, the stride matches the biomechanical ideal for the stated height.
Example 2: Compact Garden Path, Smaller Stones
- Pathway length: 15 ft
- User height: 60 in (5 ft 0 in)
- Target stride: 22 in
- Stone diameter: 12 in
Result: Center-to-center spacing = 22 in. Gap between stones = 22 - 12 = 10 in. Total stones = ceil((15 x 12) / 22) + 1 = ceil(8.18) + 1 = 10 stones.
The 10-inch gap is in the marginal range. Functionally walkable for the primary adult user, but children or elderly visitors will find it requires a noticeable step across. Replacing the 12-inch stones with 14-inch stones at the same stride drops the gap to 8 inches -- an improvement without changing stone count or spacing layout.
Example 3: Budget-Stretch Hazard Scenario
- Pathway length: 30 ft
- User height: 68 in (5 ft 8 in)
- Target stride: 36 in (chosen to reduce stone count)
- Stone diameter: 12 in
Result: Center-to-center spacing = 36 in. Gap between stones = 36 - 12 = 24 in. Total stones = ceil((30 x 12) / 36) + 1 = ceil(10) + 1 = 11 stones.
A 24-inch open gap between stones is more than the stride length itself. Every step between stones requires a stride adjustment, a short hop, or a stutter-step on the surrounding ground. This is the exact failure mode the stutter-step hazard check is built to catch. Eleven stones is an appealing number to buy; the resulting pathway is unsafe at that stone size. Either close the spacing to 20 to 24 inches (increasing stone count to 19 to 22) or switch to a larger stone diameter of 24 inches or more.
Reference Table (Fast Lookup)
All gap values are computed as: Gap = Stride - Stone Diameter. Stone counts assume a 40-foot pathway. Safety ratings apply the thresholds built into the calculator: gap under 6 in = Safe, 6 to 12 in = Marginal, over 12 in = Trip Hazard.
| Stride (in) | Gap: 12" Stone | Gap: 18" Stone | Gap: 24" Stone | Stones (40 ft) | Safety (18" Stone) |
|---|---|---|---|---|---|
| 16 | 4 in | Flush / overlap | Overlap | 31 | Safe |
| 18 | 6 in | Flush | Overlap | 27 | Safe |
| 20 | 8 in | 2 in | Overlap | 25 | Safe |
| 22 | 10 in | 4 in | Flush / overlap | 23 | Safe |
| 24 | 12 in | 6 in | Flush | 21 | Safe (ideal) |
| 28 | 16 in (HAZARD) | 10 in | 4 in | 18 | Marginal |
| 32 | 20 in (HAZARD) | 14 in (Marginal) | 8 in | 16 | Marginal |
| 36 | 24 in (HAZARD) | 18 in (HAZARD) | 12 in | 14 | Trip Hazard |
| 42 | 30 in (HAZARD) | 24 in (HAZARD) | 18 in (HAZARD) | 12 | Trip Hazard |
Key insight from the table: At a 36-inch spacing -- the most common budget-stretch choice -- even an 18-inch stone produces an 18-inch gap. That is more than the full length of the stone itself exposed as open ground per step. No ground cover can fix that ergonomically.
How the Calculation Works (Formula + Assumptions)
Show the calculation steps
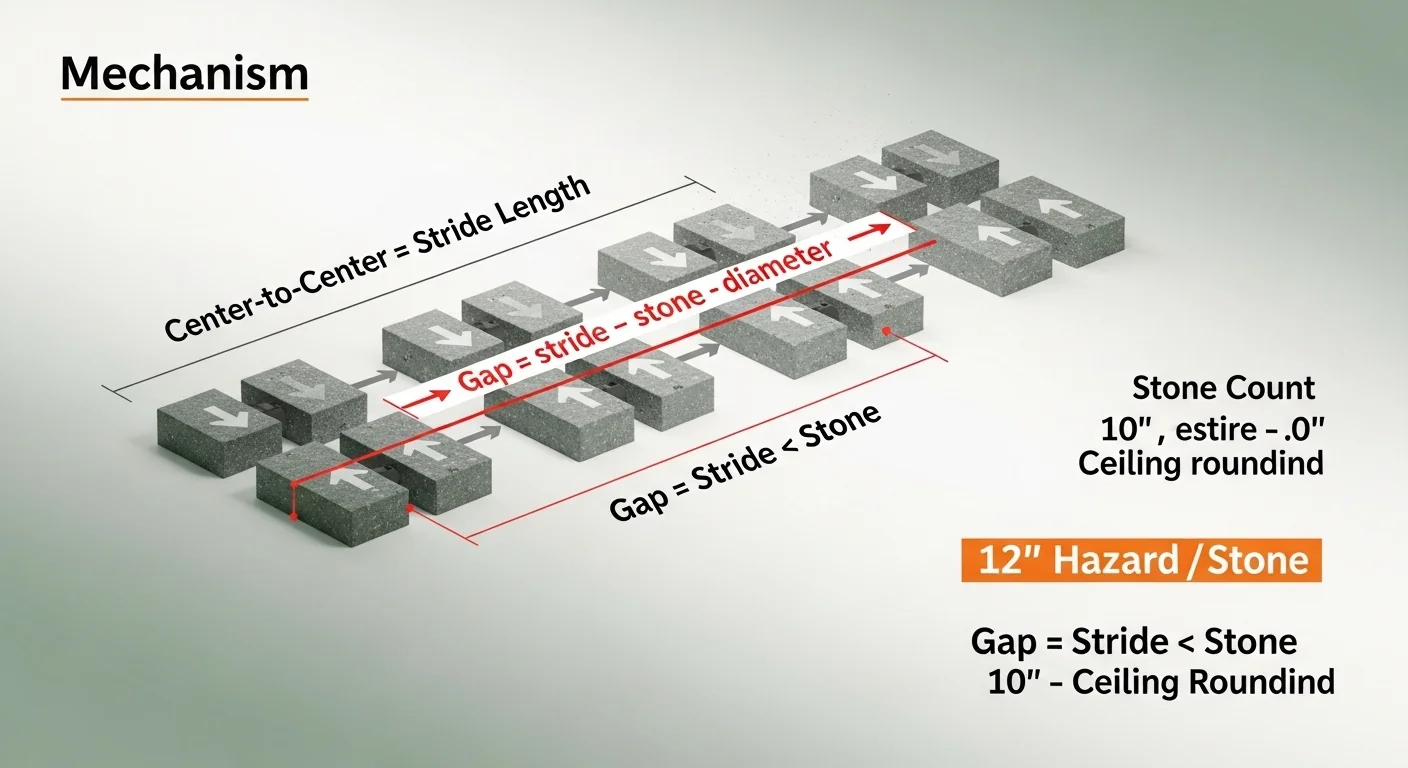
Step 1: Center-to-Center Spacing
The center-to-center spacing is set equal to the target stride length input. This is the foundational principle: stone placement should match the walker's natural stride, not the other way around.
Center-to-Center Spacing = Target Stride Length
Step 2: Gap Between Stones
The gap is the open ground distance between the trailing edge of one stone and the leading edge of the next. It is computed by subtracting the stone diameter from the stride length.
Gap = Stride Length - Stone Diameter
A negative result means stones overlap or are flush -- no open gap. This is valid and common for dense, patio-style layouts.
Step 3: Total Stones Required
Path length is converted from feet to inches (multiply by 12), then divided by stride length. The result is rounded up to the nearest whole stone using ceiling rounding, then one stone is added for the starting position.
Total Stones = ceil((Path Length ft x 12) / Stride Length) + 1
The +1 accounts for the stone at the origin of the path. Without it, the count undercounts by one stone for every pathway.
Step 4: Suggested Stride Calculation
The stride suggestion is derived from a biomechanics approximation: comfortable casual stride length is approximately 39 percent of a person's standing height in inches.
Suggested Stride = Height (in) x 0.39
This is a general estimate suitable for healthy adults. The calculator rounds to the nearest whole inch.
Step 5: Hazard Threshold
The calculator evaluates the gap against two thresholds: gaps over 6 inches are flagged as marginal, and gaps over 12 inches trigger the stutter-step trip hazard warning. These thresholds are fixed values derived from the tool's kinesiology-based safety standards, not user-adjustable inputs.
Assumptions and Limits
- The formula assumes a straight, single-file pathway. Curves, switchbacks, and side-by-side double rows require separate layout calculations.
- Stride suggestion (height x 0.39) is calibrated for healthy adults walking at a casual pace. Children typically need 15 to 20 percent shorter spacing; elderly users or those with mobility limitations may require 10 percent shorter spacing than the suggestion.
- Stone shape is treated as uniform. Highly irregular flagstone pieces may have effective footprint dimensions smaller than the largest dimension entered, meaning the actual gap could be larger than calculated.
- The calculator does not account for grade changes. On a slope, effective stride shortens on ascent and lengthens on descent -- the flat-grade spacing may feel too long going uphill.
- Stone count uses ceiling rounding plus one. For very short paths (under 5 feet), this may overstate stones needed by one unit.
- The tool does not account for stone settling over time. Stones set in soil without a compacted base layer can shift, creating uneven and widening gaps after the first freeze-thaw cycle. Base preparation affects long-term gap consistency. A compacted gravel base layer beneath each stone is the standard method for reducing seasonal movement.
- Maximum inputs: 1,000 ft path length, 96-inch height, 60-inch stride, 48-inch stone diameter. Values outside these ranges are rejected by the validator.
Standards, Safety Checks, and "Secret Sauce" Warnings
Critical Warnings
- The 12-inch gap rule is a hard limit, not a guideline. The human brain builds a walking cadence within the first three to four steps of any path. When a gap exceeds 12 inches, the cadence cannot complete naturally -- the leg must either extend beyond its comfortable range or abort the stride and reset with a double-step. Both responses increase the probability of a fall, especially for users carrying objects, wearing sandals, or walking at dusk.
- Stone count is the wrong variable to optimize for budget. Reducing stones by increasing spacing is the single most common cause of hazardous flagstone paths. A path that requires 8 fewer stones but produces a 20-inch gap has traded safety for marginal material savings. The right lever for reducing cost is stone size, not spacing.
- Marginal gaps (6 to 12 inches) become hazardous in wet conditions. A gap that is manageable on dry ground becomes slippery when the exposed soil or mulch is wet. If your path is in a shaded, high-moisture area, treat the 6-inch threshold as the effective maximum rather than the 12-inch limit.
- Children's paths require shorter spacing than adult calculations produce. A stride calculation based on an adult's height will produce spacing that is genuinely unsafe for children under 12 years old, whose stride is significantly shorter. If children will use the path, recalculate using the child's height and use the shorter spacing result.
Minimum Standards
- Gap between stones: 6 inches or under for unrestricted safe use by healthy adults.
- Center-to-center spacing: 22 to 26 inches for casual adult walking pace on flat grade.
- Stone surface area: large enough to accommodate a full foot plant without requiring precise foot placement. A stone under 10 inches in diameter forces the walker to aim rather than walk naturally.
- Base preparation: each stone should rest on a 2 to 4 inch compacted gravel base set flush with or slightly above surrounding grade to prevent edge catch and tripping at stone margins. The retaining wall calculator covers compaction and base standards for adjacent hardscape elements that share the same foundation principles.
Competitor Trap: Most stepping stone spacing guides recommend a center-to-center distance without ever mentioning stone size. A guide that says "place stones 24 inches apart" without knowing whether you are using 8-inch pavers or 18-inch flagstones is giving you half the answer. The gap, not the spacing, is what determines safety -- and the gap is inseparable from stone size. Any resource that omits that calculation is leaving the most critical variable out of the decision. Additionally, guides that reference the ergonomics of step and riser height often apply the same stride principles to horizontal pathway spacing -- confirming that biomechanics, not aesthetics, must drive the layout.
Common Mistakes and Fixes
Mistake: Choosing Stone Size Before Calculating Spacing
Most DIY projects start with a trip to the stone yard where an attractive, affordable stone size is selected without first knowing what gap that size will produce at a comfortable stride. A 12-inch stone sounds substantial until the calculator reveals it leaves a 12-inch gap at a 24-inch stride -- right at the hazard boundary. The fix: run the calculator with your intended stride first, then filter stone sizes to those that produce a gap of 6 inches or less at that stride.
Mistake: Measuring Pathway Length as a Straight Line
For paths that curve around a garden bed or bend around a corner, the straight-line distance between endpoints can be significantly shorter than the actual walking distance. Under-measuring leads to under-ordering stones, which then forces a revision of spacing mid-installation. Walk a flexible measuring tape along the actual route before entering the path length value.
Mistake: Ignoring Seasonal Ground Shift on Spacing
Stones set directly into soil without a gravel sub-base are subject to frost heave and settling that can widen gaps by 1 to 3 inches over one or two winters. A gap that began safely at 8 inches may reach 10 to 11 inches after the first freeze cycle. Setting each stone on a compacted gravel layer at least 2 inches deep prevents most seasonal movement. For paths near slopes or areas with drainage challenges, the patio slope calculator can help evaluate grade and drainage requirements that affect base stability.
Mistake: Applying Adult Spacing to a Mixed-Use Path
A path used by both adults and children requires the more conservative calculation. Because a child's natural stride is considerably shorter than an adult's, adult-optimized spacing forces children into the very stutter-step pattern the calculator is designed to prevent. If both age groups use the path regularly, recalculate using the child's height and apply the shorter resulting stride spacing. Adults adapt to closer spacing more easily than children adapt to wider spacing.
Mistake: Treating Stone Count as the Primary Success Metric
Stone count is useful for ordering materials, but it has no bearing on whether the path is safe. A path of 11 stones with a 24-inch gap between each is not better than a path of 21 stones with a 6-inch gap -- it is dangerous. Total cost should be compared at the spacing that produces a safe gap, not at the spacing that minimizes stone count. For related material quantity planning where total coverage matters more than per-unit spacing, the river rock calculator provides a useful reference for alternative pathway fill materials where coverage-per-area is the primary variable.
Next Steps in Your Workflow
Once the calculator confirms a safe spacing and stone count, the next preparation step is the joint or gap treatment. Leaving bare soil between stones allows weeds to establish and can make the gap visually larger than it is, increasing the psychological sense of distance between stones. Planting low-growing ground cover -- creeping thyme, moss, or low sedums -- in the gaps reduces that effect while also guiding the walker's eye along the path naturally. If your path is in a hardscape context with more precise joint requirements, the polymeric sand calculator covers joint-locking material quantities for stone-on-compacted-base installations where organic ground cover is not the preferred solution.
Pathway edging also affects long-term spacing integrity. Without a defined edge, stones on soft-soil paths migrate outward over time as foot traffic compresses the surrounding ground unevenly. A landscape edging strip installed along both sides of the path holds the base material in place and prevents lateral stone drift that can progressively widen gaps. Before finalizing your project scope, the landscape edging calculator can quantify the linear footage and material volume needed for your specific path dimensions.
FAQ
What is the standard center-to-center spacing for stepping stones?
The widely cited ergonomic standard for casual adult walking is 22 to 26 inches center-to-center, with 24 inches being the most commonly recommended starting point. That figure is the stride distance, not the gap. The actual gap you experience depends on subtracting your stone's diameter from that spacing -- which is what this calculator computes directly.
How do I know if my stepping stone gap is too wide?
The threshold used in this calculator is 12 inches. Gaps above that measurement force most adult walkers to make a conscious stride adjustment -- a short leap, an awkward stutter-step, or an exaggerated reach. Gaps between 6 and 12 inches are considered marginal. Gaps at 6 inches or under feel natural to most healthy adults walking at a relaxed pace.
Does the stone's thickness affect the spacing calculation?
No. The spacing formula uses the stone's footprint dimension in the direction of travel -- its surface length or diameter -- not its thickness. Thickness matters for setting depth and surface height relative to surrounding grade, but it has no bearing on the stride spacing or gap calculation.
Can I use this calculator for a curved flagstone pathway?
The spacing formula applies to curved paths, but the path length input must reflect the actual walking distance along the curve, not the straight-line distance between endpoints. Measure a flexible tape along the curved walking route. The one adjustment to consider on tightly curved sections is that the effective stride may feel shorter on the inside of a curve, so spacing on very tight bends may benefit from being reduced by 2 to 3 inches from the straight-path result.
What ground cover works best between stepping stones?
Creeping thyme (Thymus serpyllum) is the most commonly recommended low-growing option because it tolerates light foot traffic, stays under 2 inches tall, and produces a visual texture that makes gaps look intentional rather than absent. Moss works well in shaded, moisture-retaining environments. Corsican mint and woolly thyme are alternatives that also handle occasional foot contact. Avoid ground covers that exceed 3 inches in height, as they can create edge-catch trip hazards at the stone margins.
Why does the calculator add 1 to the stone count result?
The division step (path length in inches divided by stride) calculates how many stride intervals fit in the path. But the path needs a stone at the start of the first interval as well as the end of the last. That requires one additional stone beyond the interval count. Without the +1, every pathway calculation undercounts by exactly one stone regardless of length or spacing.
Conclusion
Stepping stone spacing is a biomechanics problem that most guides reduce to an aesthetics recommendation. The gap between stones -- not the spacing, not the stone count, not the material cost -- is the variable that determines whether a path is safe to walk on. A gap over 12 inches forces the human stride pattern to break, and that break is not a minor inconvenience: it is the mechanism behind a disproportionate share of garden path slip-and-fall incidents. The correct approach is to fix the stride first, then select stone sizes that produce a safe gap at that stride.
The single most preventable mistake in flagstone pathway design is choosing the stone size and spacing simultaneously to minimize material cost, without evaluating the gap that combination produces. Run the numbers before the purchase, not after. Once you have a confirmed safe layout, gravel-based sub-bed preparation and a defined pathway edge are the two remaining variables that determine whether the spacing stays correct over time rather than drifting into marginal territory after the first winter. For projects where the surrounding landscaping budget also needs planning, the gravel calculator covers base material volumes for both pathway sub-beds and surrounding landscape areas.
Lead Data Architect
Umer Hayiat
Founder & Lead Data Architect at TheYieldGrid. I bridge the gap between complex agronomic data and practical growing, transforming verified agricultural science into accessible, mathematically precise tools and guides for serious growers.
View all tools & guides by Umer Hayiat →