Cinder block raised beds deliver an edge in edible gardening by using the concrete mass to buffer soil temperatures against daily swings, creating steadier root zone conditions than wood or metal alternatives. This reframing shifts the focus from simple cost savings to deliberate layout choices that match your climate and crop needs.
The guide covers nine modular cinder block configurations suited to edible gardening. It includes height options, shapes, linings, and integrations for drainage or vertical growth. It excludes wood, metal, composite, or fabric-only beds as well as non-edible landscaping applications.
Readers will gain a clear decision path to select a build that fits their space, rainfall pattern, and frost dates, avoiding mismatches that lead to uneven moisture or root stress. Each section supplies exact mechanisms, constraints, and pairings for immediate planning.
Bottom line: Align your local frost window and annual rainfall with one of the three decision branches to select a cinder block layout that supports steady edible production.
The Yield Grid Decision Grid
Branch 1 applies when your area records last spring frost after April 15 or first fall frost before October 15. Thermal mass priority stabilizes soil for early and late crops. Recommended: Items 1, 4, 7 below.
Branch 2 applies when annual precipitation exceeds 40 inches. Drainage and lining priority prevents waterlogging and soil washout. Recommended: Items 2, 5, 8 below.
Branch 3 applies when available garden footprint measures under 100 square feet. Modular efficiency priority maximizes usable planting area without wasted corners. Recommended: Items 3, 6, 9 below.
To weigh these layouts against traditional in-ground methods, see our guide on raised bed vs in-ground gardening.
Quick Comparison Table
| Option | Key mechanism | Best for | Decision Grid Branch | Effort Score |
|---|---|---|---|---|
| Double-Stacked Rectangular Cinder Block Raised Beds | Two layers of standard 8 by 8 by 16 inch blocks creating 16 inch height with thermal mass | Frost-prone sites needing root zone stability | 1 | 2 |
| Single-Layer Herb Pocket Cinder Block Raised Beds | Hollow cores left open on top layer for direct planting of compact herbs | High-rainfall areas seeking extra drainage channels | 2 | 1 |
| U-Shaped Cinder Block Raised Beds | Three-sided layout using blocks to enclose a central growing zone | Compact urban spaces optimizing edge access | 3 | 3 |
| Trellis-Integrated Cinder Block Raised Beds | Vertical rebar slots cast into block cores for stable trellis attachment | Frost-prone sites pairing height with vertical edibles | 1 | 4 |
| Landscape-Fabric-Lined Cinder Block Raised Beds | Interior fabric barrier separating block pores from soil fill | High-rainfall areas controlling moisture migration | 2 | 2 |
| L-Shaped Corner Cinder Block Raised Beds | Two-sided corner configuration fitting against existing structures | Compact urban spaces using boundary walls | 3 | 2 |
| Base-Elevated Cinder Block Raised Beds | Gravel or paver base layer raising entire structure 4 inches | Frost-prone sites improving air flow under blocks | 1 | 3 |
| Capstone-Seated Cinder Block Raised Beds | Flat cap blocks mortared on top row for wide seating surface | High-rainfall areas adding ergonomic access | 2 | 3 |
| Modular Expandable Cinder Block Raised Beds | Interlocking straight sections designed for future additions | Compact urban spaces allowing phased growth | 3 | 2 |
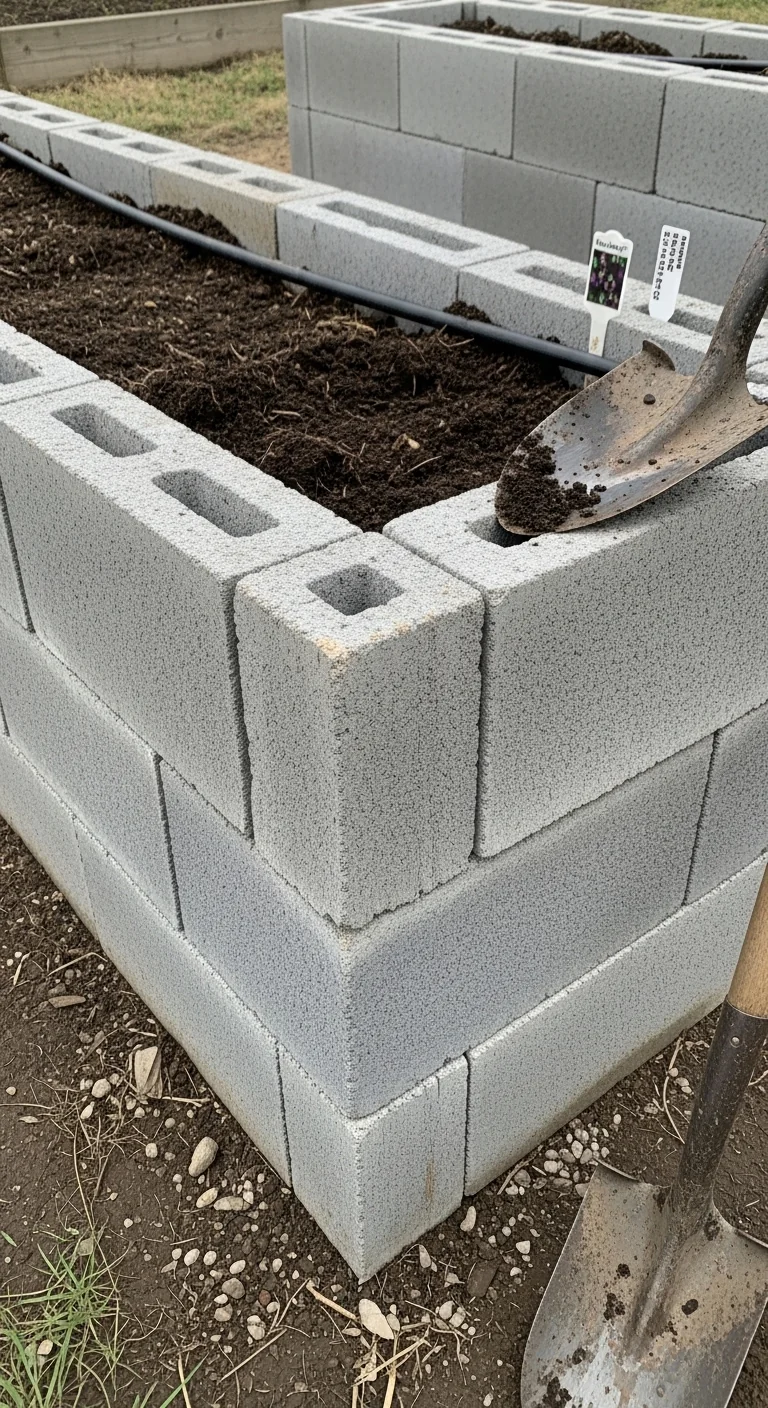
Double-Stacked Rectangular Cinder Block Raised Beds
Best for: Branch 1
Start with a level gravel base 4 inches deep and 10 inches wider than final dimensions. Stack two courses of standard 8 by 8 by 16 inch blocks in running bond pattern so vertical joints offset by half a block. Fill interior with chosen soil mix after placing landscape fabric along inner faces to contain fill without blocking drainage holes at base level. Cap the top row with flat blocks if seating is desired.
The double height supplies enough thermal mass to moderate soil temperature swings of 10 to 15 degrees Fahrenheit between day and night in spring and fall. This configuration works for tomatoes, peppers, and leafy greens that benefit from consistent root warmth. Avoid in zones with sustained summer highs above 95 degrees Fahrenheit unless afternoon shade cloth is added.
Common mistake: skipping the gravel base on clay soil, which allows blocks to settle unevenly within one season. Link the interior fill strategy to soil selection strategies for edible beds.
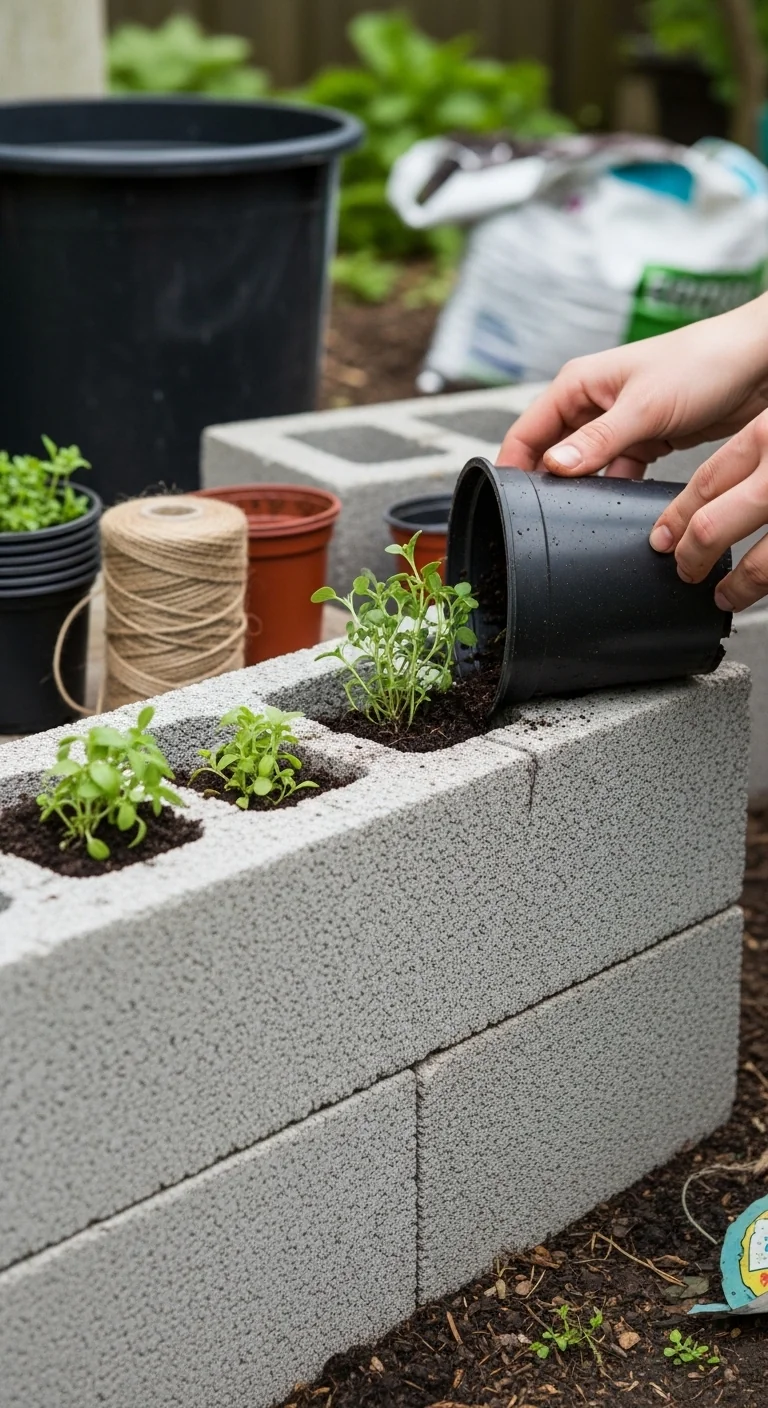
Single-Layer Herb Pocket Cinder Block Raised Beds
Best for: Branch 2
Use a single course of blocks set on leveled sand. Leave every other hollow core open on the top face and fill those pockets with potting mix for herbs such as thyme or oregano. Plant directly into the open cores while filling the main bed area normally.
Skip this option on slopes steeper than 3 degrees because the single layer lacks lateral stability. The open cores increase drainage surface area, reducing water pooling after heavy rain events.
U-Shaped Cinder Block Raised Beds
Best for: Branch 3
Form three sides with blocks two high and leave the fourth side open for access. Use a string line to keep corners square within 1 inch over 8 feet. The U shape concentrates planting area against a south-facing wall for passive heat gain while keeping all soil reachable from outside.
Apply when total space is under 80 square feet. Threshold rule: if your longest side exceeds 12 feet, add a center support block every 6 feet to prevent bowing under soil pressure. Pair with drip irrigation layouts routed along the inner perimeter for uniform watering.
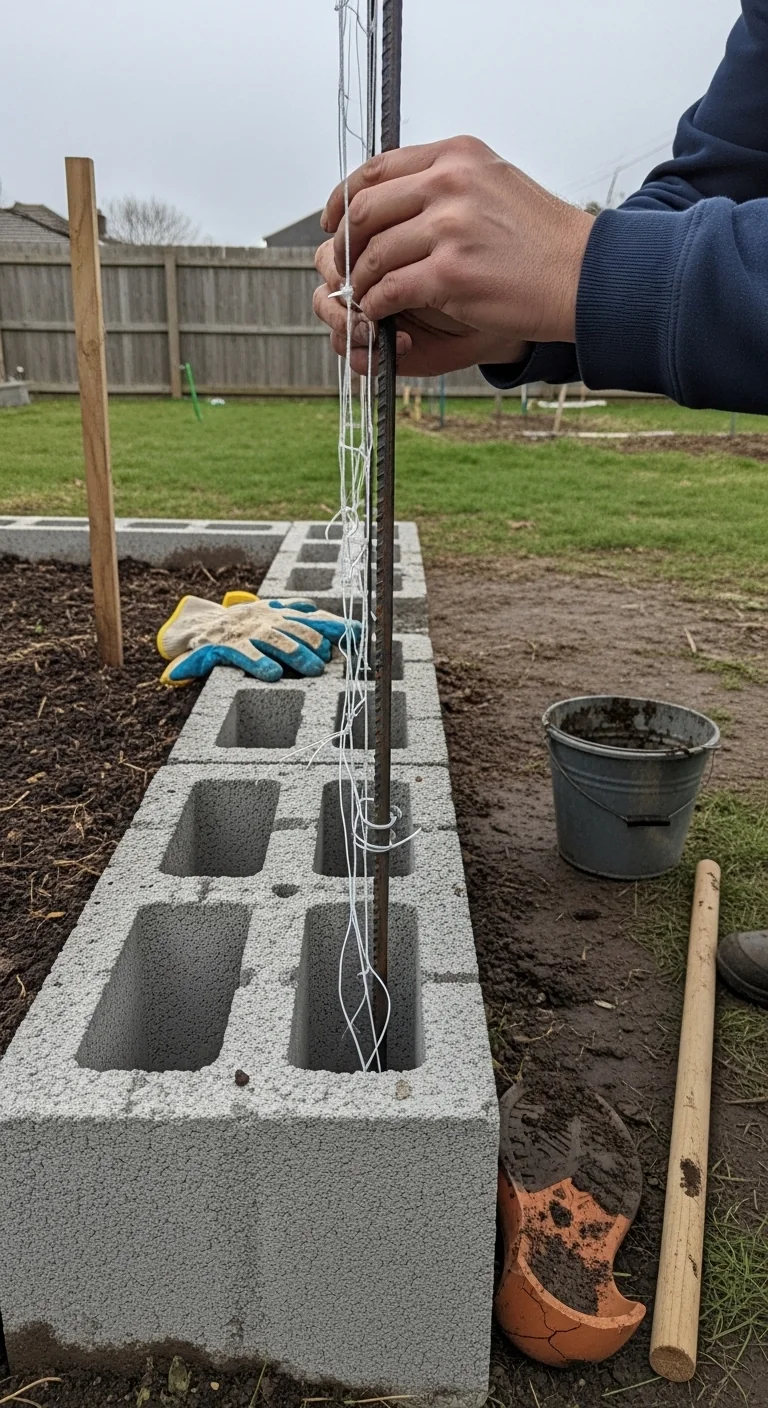
Trellis-Integrated Cinder Block Raised Beds
Best for: Branch 1
Insert 0.5 inch rebar vertically into every fourth block core during stacking and secure with concrete mix poured to half depth. Attach trellis panels or netting once blocks cure for 48 hours. The resulting structure supports vining crops up to 6 feet tall without separate posts.
This 10-minute workflow upgrade converts a basic rectangle into vertical production space: level base, stack first course, drop rebar, finish stacking, plant. In frost-prone zones the added height keeps fruit off cold ground while thermal mass warms the base soil. For full integration details see our diy raised bed trellis guide.
Landscape-Fabric-Lined Cinder Block Raised Beds
Best for: Branch 2
Line all inner block faces with permeable landscape fabric before adding soil. Overlap seams by 6 inches and staple to block tops. The fabric stops fine particles from migrating into block pores yet allows water to exit at the base.
Use versus skip: choose lining in areas receiving over 40 inches of rain to limit soil loss. Skip lining in arid zones where extra evaporation through block walls aids dry soil management. Edge case: heavy clay fill requires double fabric layers at base to avoid clogging.
L-Shaped Corner Cinder Block Raised Beds
Best for: Branch 3
Position two adjacent sides against existing fence or wall using blocks two high. Secure the open corner with a vertical rebar driven 12 inches into ground. The L shape utilizes boundary lines for support and frees center yard space.
Threshold rule: limit each leg to 8 feet or less when soil depth reaches 16 inches to keep lateral pressure under 200 pounds per linear foot. This layout fits narrow side yards under 6 feet wide and pairs well with wicking systems for even moisture along the wall side.
Base-Elevated Cinder Block Raised Beds
Best for: Branch 1
Lay a 4 inch layer of crushed gravel or concrete pavers under the first course of blocks. This elevation improves air circulation beneath the structure and reduces ground contact moisture that can wick upward into soil. In frost-prone zones the added gap helps soil warm faster in spring by 3 to 5 days compared with ground-level placement.
Combine with double stacking for maximum effect. The mechanism prevents capillary rise from underlying soil while maintaining full thermal mass above. Use only on level sites; slopes require additional retaining blocks at the low end.
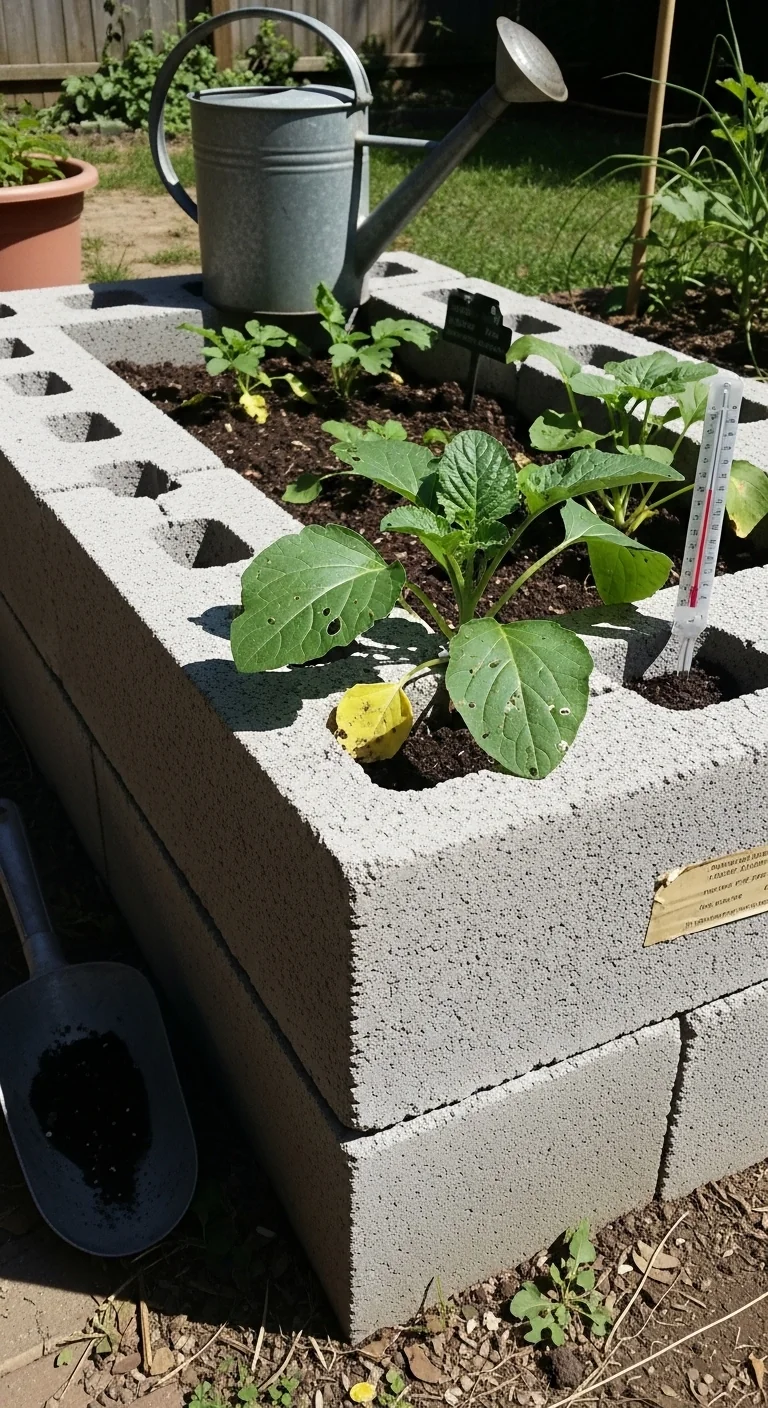
Capstone-Seated Cinder Block Raised Beds

Best for: Branch 2
Mortar flat cap blocks across the top course to create a continuous 8 inch wide seat. The wide surface allows comfortable kneeling or sitting during harvest without compressing soil edges. In high-rainfall zones the cap also sheds water away from the interior fill.
Limit to beds under 20 feet long to keep mortar joints stable without reinforcement. The seating reduces bending strain during maintenance tasks that occur after rain when soil is soft.
Modular Expandable Cinder Block Raised Beds
Best for: Branch 3
Build straight sections of 4 or 8 feet using standard blocks, leaving end cores open for future interlocking connections via rebar pins. Each new section attaches in under 30 minutes without dismantling existing beds. This design scales from 8 square feet to 64 square feet over multiple seasons as space or budget allows.
Blueprint steps: lay first section on gravel base, plant and fill, then add adjacent modules by aligning open cores and dropping connecting rebar. The modularity suits renters or homeowners testing edible layouts before permanent commitment.
Starter Stack (What to Choose First)
For Branch 1 (frost-prone areas)
Start with double-stacked rectangular (Item 1) plus trellis-integrated (Item 4). The combination supplies thermal buffering at the base and vertical space for indeterminate tomatoes or pole beans. Estimated assembly: 3 to 5 hours and 120 to 250 dollars in blocks and fill materials.
For Branch 2 (high-rainfall zones)
Start with landscape-fabric-lined (Item 5) plus capstone-seated (Item 8). Lining controls moisture migration while the cap provides dry seating after storms. Estimated assembly: 2 to 4 hours and 90 to 180 dollars.
For Branch 3 (compact urban spaces)
Start with U-shaped (Item 3) plus L-shaped corner (Item 6). Both maximize perimeter access in tight footprints and share the same block inventory for future expansion. Estimated assembly: 2 to 3 hours and 70 to 140 dollars.
When This Won’t Work
Cinder block raised beds fail when the site slope exceeds 5 degrees and no retaining base is installed. Blocks shift within the first heavy rain cycle, cracking joints and spilling soil. Switch to a terraced wood or elevated design on such grades.
They also fail when daytime soil temperatures stay above 85 degrees Fahrenheit for more than 14 consecutive days without shade. The thermal mass then overheats root zones of cool-season crops such as lettuce or spinach. Provide 40 percent shade cloth or plant only heat-tolerant edibles.
In either case see our guide on winterizing raised beds for off-season adjustments that extend usability.
Choosing the Right Option for Your Situation
Budget threshold
If total materials stay under 200 dollars for a 4 by 8 foot bed, select single-layer or modular expandable options (Items 2 or 9). These require fewer blocks and minimal extras.
Time threshold
If assembly must finish in one weekend or less than 6 hours, choose single-layer herb pocket or L-shaped corner (Items 2 or 6). Both skip advanced reinforcement steps.
Technical constraint
If native soil is heavy clay with drainage slower than 1 inch per hour, select lined or base-elevated options (Items 5 or 7) to isolate fill from underlying compaction.
Yes/No checklist:
Does your frost window exceed 180 days? Yes leads to Branch 1.
Does annual rainfall top 40 inches? Yes leads to Branch 2.
Is garden space under 100 square feet? Yes leads to Branch 3.
All no defaults to ground-level in-ground methods.
Expert Q&A
How do hollow cores in cinder blocks affect air circulation around edible roots?
The open vertical cores create natural air channels along the bed perimeter that improve oxygen exchange in the outer 4 inches of soil. This reduces compaction risk in dense mixes and helps prevent anaerobic conditions after heavy watering. Monitor core openings yearly and clear debris to maintain flow.
Can older cinder blocks from demolition sites be reused safely for vegetable beds?
Only if the blocks show no visible mortar residue, paint, or staining and test clean for heavy metals via local extension service kits. Modern manufactured blocks meet current safety standards for direct soil contact. Discard any with efflorescence or crumbly surfaces that could release particles into the fill.
What spacing between cinder block beds allows equipment access for larger edible plantings?
Maintain 36 inches between parallel beds to accommodate wheelbarrows or small tillers. Narrower 24 inch gaps work for hand tools only. Factor in mature width of vining crops trained outward to avoid blocking pathways.
Does block color influence soil temperature enough to change planting dates for warm-season edibles?
Light gray standard blocks absorb less solar energy than darker variants, keeping daytime soil peaks 4 to 6 degrees lower in full sun. In marginal climates this difference can advance safe planting by 7 to 10 days for beans or cucumbers when paired with row covers at night.
How do cinder block beds interact with companion planting layouts for crops like zucchini?
The straight edges simplify grid-based companion patterns such as three sisters or square-foot spacing. Place heavy feeders like zucchini in center rows and lighter herbs in perimeter pockets formed by block cores. The stable walls also support temporary netting to protect young transplants from wind or pests.
Conclusion
Cinder block raised beds excel when thermal mass and modularity align with local frost dates and rainfall rather than defaulting to lowest price. The primary mistake is ignoring site-specific drainage or temperature swings, which leads to preventable soil loss or root stress within the first season.
Next step: measure your available space and note last frost date, then select the matching branch and two starter items. Begin with the self-watering raised bed approach to test moisture consistency before full expansion.
Lead Data Architect
Umer Hayiat
Founder & Lead Data Architect at TheYieldGrid. I bridge the gap between complex agronomic data and practical growing, transforming verified agricultural science into accessible, mathematically precise tools and guides for serious growers.
View all tools & guides by Umer Hayiat →